How to start a blog in India within 5 minutes-Easy step by step guide

In this article, I am going to show you the exact step by step procedure for how to start a blog in India. And not only in India, whatever the country you are from these are the actual steps you need to follow to create a website for your business.
Note: The following steps can help you start a blog. So, you don’t need to hire a freelancer or digital marketing agency to start a blog for you. This post will save your time and money.
How to start a Blog in India? – 9 Easy step by step procedure
- Choose the niche that you’re passionate about
- Grab a strong branded domain name
- Find the right Blogging platform
- Choose your hosting (promote & lengthier)
- Configure hosting with domain name
- Choose a theme & Design your blog
- Install the important plug-in
- Write your first content
- Promote your blog
The main objective of this post is to make easier to start a blog. So, I discussing the small procedures very detailed manner.
Why you want to start a blog:
Find the right reason to start a blog. It may be the following reasons:
Making money with your blog:
It would be one of your reasons; making money with your own blog by starting a blog today. I already discussed the top 10 earning bloggers and their income. So, check out that if you want to know the potential and power of blogging.
Improve your business reach:
Having your business website is a must one in the digital arena. But, if you have a piece of contents talking about the product and educating your customer then its added advantage for your business.
Blog writing for business is helpful for brand awareness and brand reach.
Share your thoughts:
There is no commercial intent. It may be sharing your thoughts to the world. You can share your personal life or you can help people by doing blogging.
These are the main 3 reasons for people to start a blog. If you don’t know why you are starting your blog, then you can choose your reasons here.
Some frequently asked Questions (FAQ) to start a blog:
How much it cost to start a blog?
It cost you around less than 5 dollars a month. The expanses of your website will be hosting that costs $3.95 dollar a month and domain costs you less than $1 a month. Exactly, you will spend around 58 dollars (4300 rupees).
Can I start a blog for free?
Yes, you can start a blog on a free platform. But, I am not advising you to not start a free blog. Because you will not get the desired results you want like making money with your blog and increasing your traffic. It’s difficult to rank to get the traffic or making money from a blog.
The search engine gives importance to a faster loading website. In the free platform, you will not get faster-loading speed and hard to rank in Google. The free platform can shut down your blog at any time.
If you are serious about blogging then start a self-hosted Blog. In paid hosting, you can use a lot of plug-in and features that you will not get in a free platform. So always spend some little money to start a blog.
Is it technical skills are needed to start a blog?
No. There is no coding skills are required to start a blog. Word press platform is already pre-coded and you don’t need to do any coding. WordPress platform is like using Microsoft office. So, it’s easy to start and manage a blog.
Step#1 Choose the niche you are passionate about
Before you are starting a blog, you have to find out the niche that you want to write. It should be balanced between the market opportunity and the thing you passionate to talk about. There are many niches are there, but you need to figure out what you good at and what you love to talk. At the same time, the niche you are choosing should be profitable for you.
If you don’t have any idea about finding niches then coming 8 niches are very popular and profitable.
- Health and Fitness Niche
- Personal Finance
- How to make money
- Tech niche (Gadgets)
- Food Niche
- Lifestyle
- Personal development niche and
- Beauty and passion niche
These 7 also have subcategories. And one more thing from my blogging experience is that if you ask same niche blogger then they may tell it’s a saturated niche and competitive niche. So, don’t believe that nothing is saturated. Where competition is there then there will be money potential.
So, choose wisely your niche. Because This is your first step in the process. Here you put your seed to grow a plant.
Step #2 Purchase a strong branded domain name:
FAQ: What is the domain name?
Domain name is an IP address. It’s like a website address for people to find you. To reach your website or blog in online, a visitor has to type the IP address. It’s very hard to remember the IP address number. So, that domain name comes into the picture. The domain name needs to be registered in the registry.
This step is also crucial to start a blog because a domain name is your brand name. So, choose the domain name carefully with a vision of your business.
There is two kind of domain names are there. One is keyword specific and another one is a generic domain name. Keyword specific domain name means, it Exact matching domain name (EMD).
If you are doing for branding and having a long vision for your business then go for the generic name. You can able to see, ideas insider is the generic domain name and it’s not keyword specific.
But I do choose EMD names for my Amazon niche blogs.
Because I am not looking for branding in my niche blogs. So, it’s up to you which one is you wanted to choose. I suggest you go for generic and meaning full domain name for branding.
I already wrote an article about 10 tips to grab the right domain name. So, check out that for getting a clear picture.
I use and recommend Namecheap for finding a domain name. Because Namecheap is offering free whoisguard privacy for your domain name.
Click here to get a 30% offer on Namecheap
Step#3 Find the right Blogging platform
There are many blogging platforms are there. But, I recommend using WordPress. Because of its SEO friendly and Easy to use like Microsoft office software. Some of the blogging platforms are WordPress, Blogger, Jumla, square space, Wix and Weebly. But more than 30% websites out there are building by WordPress platform.
In WordPress there are two names are there. That is WordPress.org and wordpress.com. Build your blog at wordpress.org.
Because wordpress.org is a self-hosted blog and you have income making potential. In the following steps, I will teach you how to install WordPress software on your blog.
Step#4 Choose your Hosting
Choosing right hosting provider is very much important. I talk a lot about this previously. So, an important reason for choosing right hosting provider is good website loading speed, the website should be up and running without any downtime and good customer support.
I use and recommend Siteground. This blog is running on siteground with 100% uptime. Very faster loading speed and great customer support, they are providing.
Click here to get a 60% discount on Siteground all plans. click here and open this link in new window show that you can follow the exact same steps next).
I will show you the exact step by step procedure for hosting your, self-hosted blog with siteground. Follow the steps one by one carefully.
Use the special offer link and select your suitable plan:
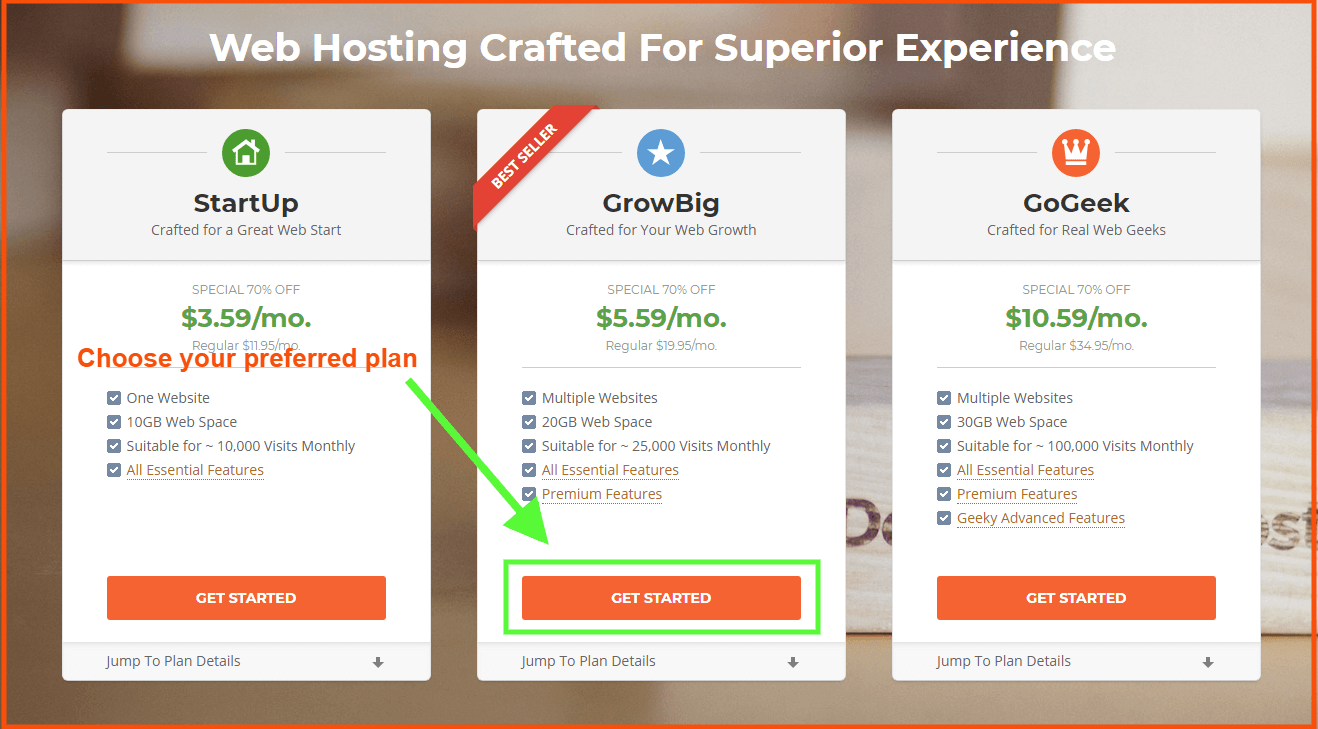 Siteground is having 3 different plans in their services. If you are a beginner with one website then go with a startup plan. If you are looking to start multiple websites then go with grow big plan.

I am using grow big plan cause I am having some other niche blogs also. So, based on your requirement choose the plan you want to choose and suitable one. Next step is to configure the domain name and the hosting.
Step#5 Configure your Domain name with hosting
Once you bought the domain name from Namecheap then configure that with siteground hosting. Let me show you the steps involved in that.

See the above screenshot and choose the ‘”I already have a domain name” option then type your domain name there. Next, click to proceed.
Complete your registration:

Next, you have to register your all the details like address and phone number. Once, you pay the amount then you can able to host your blog with siteground.
Install WordPress on your Blog
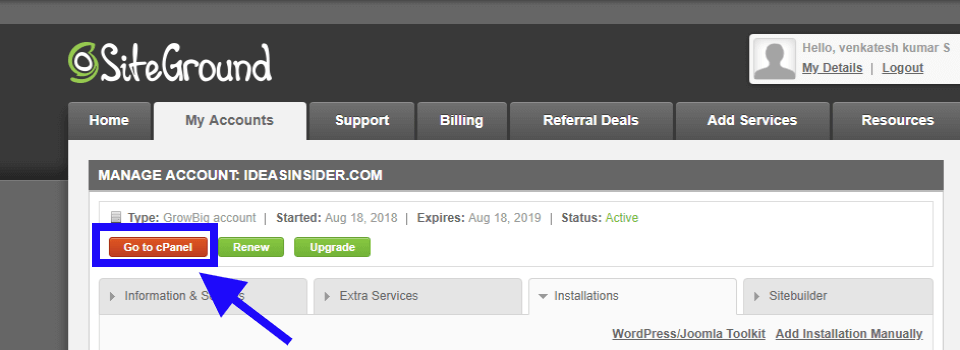
Then log in with your email ID and password. After login, go to my account then you can see your domain name with siteground. Then click the go to C-panel.
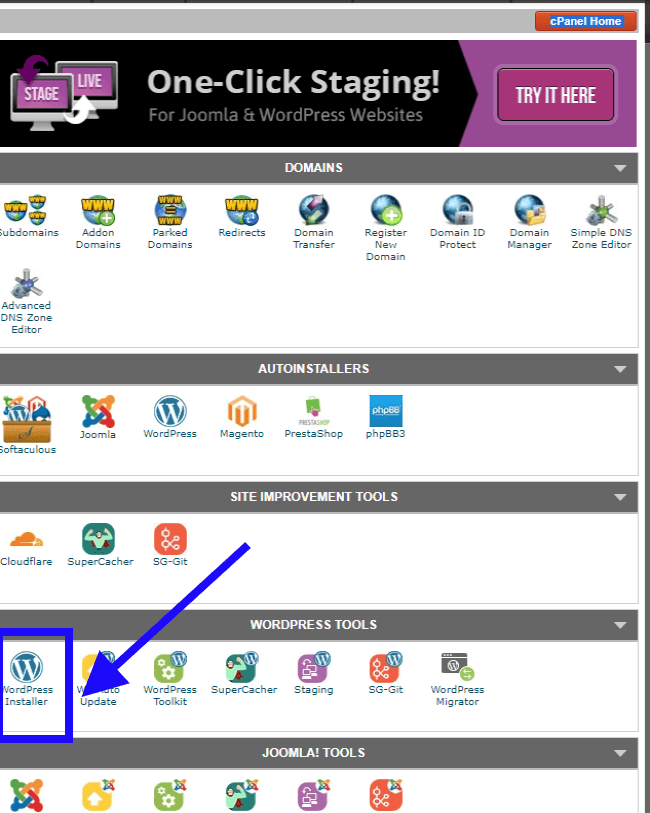 Next, in C-panel, click WordPress installer. Its a one-click WordPress installation process. Then wait for some time for the WordPress software to install on your blog.

After the installation, you will be notified then click go do dashboard.
Step#6 Choose a theme and Design your blog:
Choose your theme:
In the dashboard, there will be an option change design. So, go there and select your beautiful theme for your blog. Change your username from admin to your own name. Check the below screenshot for how to do it.

Https activation: (Free SSL certificate)

This is important for your site security and some SEO benefit also there. To install Https on your blog, again go to C-panel. Then under the security section, click let’s encrypt option. Next step is to select an option and select https settings. Now, your site is secured SSL certificate.
Step 7# Install following important plugin
Once you start a blog then you need some plugins to do the work for you. Install the following plugin on your blog. These are I am using and suggesting you tools use.
-
Google analytics:
This is the most important plugin to know how many people are visited your blog yesterday, today and last one month. To configure this plugin, you have to open a google analytics account for your website. After that create a code and paste the unique code in this plugin. Watch the below video for this.
https://www.youtube.com/watch?v=4a_U-0xQamk
This plug-in is helpful for tracking your visitors’ statics. Once your traffic goes down and then you can track and fix it.
-
Yoast SEO
This is the first plug-in, I always install if I started a new blog. By using this plugin, you can write SEO friendly content and it will improve you’re on page SEO. The recent update is so cool and it provides a lot of suggestion to improve your SEO of a content. And it provides the option to create a sitemap for your site.
-
WP smush
This plugin is helpful for compressing your image size. So, That your website will load faster.
I will use tinypng online to reduce the image and use this plugin too. Because for me website speed I very important.
-
Mail munch
This plugin is helpful for gathering email IDs from your visitors to make them subscribers to your blog. Collecting email Id from day 1 is important for your blogging journey. Here, you can create a landing page and Thanking page as well.
-
Accelerated mobile pages (AMP)
Amp is helpful for your site to be mobile-friendly to your user. Most of your website visitors come from mobile. So, you need to maintain your site as a mobile-friendly one.
-
Sassy social share
Social share plugin can help your visitors to share your content. This will give brand exposure and social share to your post.
-
Ultimate Nofollow
When you giving links back to other sites then you have to maintain proper do follow and no follow the link. You have to give no follow to your entire affiliate link. This will keep some positive link juice to your site.
-
SG optimizer
If you are using siteground hosting then this is an important plugin for activating super cache technology. So, you can enjoy faster loading speed for your website. Is improve your website speed performance.
-
Easy Table of content
This will create a table of content for your written content automatically. So, no need design table of content and this will create a table of content for you. This plugin can reduce bounce rate and provide some positive SEO.
Step #8 Write your first content (How to start writing a blog post)
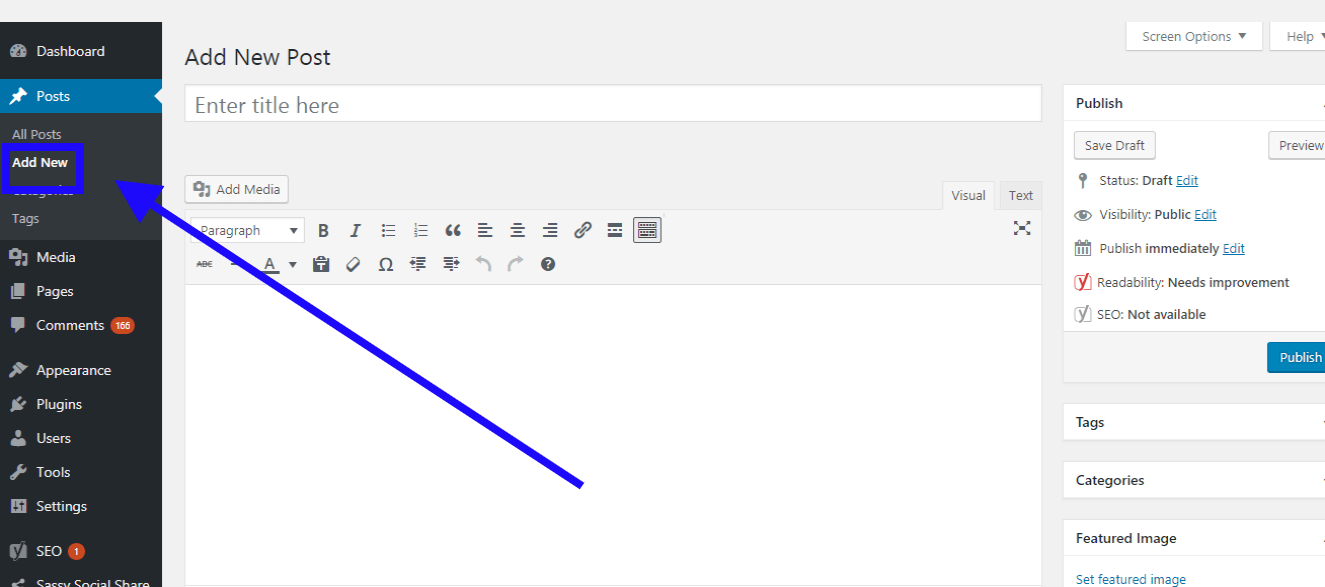
Now, everything is set for your blog. So, write your first content by go to post on the dashboard. Then under pages, clicks add new. Now you are ready to go. Write your first post and say hello to the internet world from your blog.
Step#9 Promote your blog
When you start blogging, writing a blog post is important. More than that the promotion of your website is the important one. Set up a facebook page and Instagram page for your brand. Then start promoting and start gathering fans to your brand. I hope this guide you start a blog.
Conclusion:
This post is helpful for starting your own self-hosted blog. I hope, it covers each and everything that you need to get started. So, start a blog and produce value to your audience. If you are stuck anywhere in the steps then leave in the command and I will try to help you out. Start Blogging and make changes in the world through your words.
Blogging is the best platform to earn ….u r step by step procedure of explanation is nice
Glad you like it.
Thank you for such a great tutorial.
Glad this tutorial is helpful to you.
It’s really useful to the beginners, whoever want to know about this Blog Creation, you are telling the whole story whichever is there in content…It’s Very Nice Blog.
Thanks.
Glad it helps you